DEV-CPP是一款免费的软件,它的IDE界面是由Dephi编写的,大小只有 8.89 MB,非常容易上手,还是多国语言的,有简体、繁体中文,速度不错,而且简单明了,所以可以是Visual Studio 的一个简易替代品。
下面主要说说如何使用这个软件。我使用的是Dev-C++ 5.0 beta 9.2 (4.9.9.2),从网上可以免费下载。
官方网站:http://www.bloodshed.net/,(需翻墙,你懂的),这个软件是开源的,任何人都可以下载到源码,另外,国内有垃圾人封装了恶心广告插件,是谁就不点名了(例如:Dev C++ 5 Build 1107 汉化版)。
一.HelloWorld的尝试
1.首先打开软件,File > New > Project,选择Console Application,并起名为FirstProject
2.然后保存,生成了 FirstProject.dev 的工程文件。
3.在左侧的Project下面,系统自动添加了Main.cpp文件,往里面写下如下的代码:
#include <iostream>
using namespace std;
//It means the cout and endl is in std liberary!
//The alternative way of "Using namespace std" is using "::";
//using std:cout;
//using std:endl;
//But if you write another way different with the 2 ways above,then
//there will be problem. Please have a try.This is big difference between
//C and C++
int main(void)
{
    cout<<"Hello!\n";
    cout<<"Welcome to c++!\n";
    cout<<"In C++,the \"char\" type is "<<sizeof(char)<<" bytes"<<"\n";
    cout<<"In C++,the \"short\" type is "<<sizeof(short)<<" bytes"<<"\n";
    cout<<"In C++,the \"int\" type is "<<sizeof(int)<<" bytes"<<"\n";
    cout<<"In C++,the \"long\" type is "<<sizeof(long)<<" bytes"<<"\n";
    cout<<"In C++,the \"float\" type is "<<sizeof(float)<<" bytes"<<"\n";
    cout<<"In C++,the \"double\" type is "<<sizeof(double)<<" bytes"<<"\n";
    cout<<"In C++,the \"long double\" type is "<<sizeof(long double)<<" bytes"<<"\n";
    system("PAUSE");
}
4.在工具栏里面点击Execute > Compile来编译文件,接着通过测试后,点击Execute > Run.
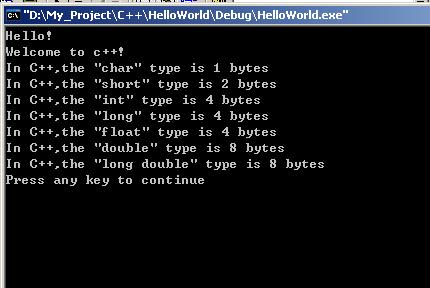
5.这样程序运行成功,会弹出一个DOS的界面,显示如下信息:

二.DLL的编译和引用
在前文中我多次写到了用VC编译DLL文件,但是DEV-CPP也是一个很好用的工具。
1.首先打开软件,File > New > Project,选择DLL,并起名为DLLProject
2.然后保存,生成了 DLLProject.dev 的工程文件。
3.在左侧的Project下面自动生成了两个文件:dll.h 和 dllmain.cpp
4.我们往dll.h中写下如下的代码:
#ifndef _DLL_H_
#define _DLL_H_

#if BUILDING_DLL
# define DLLIMPORT __declspec (dllexport)
#else /* Not BUILDING_DLL */
# define DLLIMPORT __declspec (dllimport)
#endif /* Not BUILDING_DLL */

class DLLIMPORT DllClass
{
public:
    DllClass();
    virtual ~DllClass(void);
    int Dllsum(int a,int b);
private:
};
DLLIMPORT int Fsum(int a,int b);

#endif /* _DLL_H_ */
我的目的是导出两个东西,一个是Class,一个是Fsum的Function。
5.我们往dllmain.cpp中写下如下的代码:
/* Replace "dll.h" with the name of your header */
#define BUILDING_DLL 1
#include "dll.h"
#include <windows.h>

DllClass::DllClass()
{
}

DllClass::~DllClass ()
{
}
int DllClass::Dllsum(int a,int b)
{
    return a+b;
}

DLLIMPORT int Fsum(int a,int b)
{
    return a+b;
    MessageBox (0, "Hello World from DLL!\n", "Hi", MB_ICONINFORMATION);
}

BOOL APIENTRY DllMain (HINSTANCE hInst     /* Library instance handle. */ ,
                       DWORD reason        /* Reason this function is being called. */ ,
                       LPVOID reserved     /* Not used. */ )
{
    switch (reason)
    {
      case DLL_PROCESS_ATTACH:
        break;

      case DLL_PROCESS_DETACH:
        break;

      case DLL_THREAD_ATTACH:
        break;

      case DLL_THREAD_DETACH:
        break;
    }

    /* Returns TRUE on success, FALSE on failure */
    return TRUE;
}
6.然后编译,生成了 DLLProject.dll,libDLLProject.a(相当于VC生成的.lib文件),dll.h 这三个文件是最主要的文件,用来被其他程序调用。还有一个文件叫做libDLLProject.def,从这里可以看出生成了哪些对外的接口。.lib 和 .h 总是搭配使用的,从他们的身上我们可以看到.dll中有哪些接口,但他们本身并不是代码的实现者,.dll才是。
7.下面我们再新建一个Console Application Project,命名为Test.dev
8.然后在Main.cpp 中写下如下的代码:
#include <iostream>
#include <stdio.h>
#include <stdlib.h>
#include "dll.h"

//这里引用dll.h的原理就和在上面引用的stdlib.h stdio.h是一样的,只是我们需要对
//dll.h的路径说明,而stdlib.h等在默认情况下已经写入路径了,你可以查看
//Project option

using namespace std;

int main()
{
    int b;
    b=Fsum(1,2);
    cout<<b<<’\n’;
    system("PAUSE");
return 0;
}
9.这是最重要的一步,把前面生成的DLLProject.dll,libDLLProject.a,dll.h都复制到当前的文件加下面,然后在左侧的Project下面,把dll.h添加上来之后,打开旁边的Classes,就可以看到刚才我们定义的函数和类了,这一点很直观,比VC强了很多。所以在上面的代码中,我们才能直接引用Fsum(1,2), 还有一点不能忘记的是,在Project工具栏里面,点击Project Option-> Parameters -> Linker -> Add liberiry or object, 把刚才的libDLLProject.a引入进来。
10.好了,编译运行,这样就看到结果了。
补充几个重要的知识:
1. 在Dev-CPP的IDE环境下,我们可以按住Ctrl,然后点击某个系统的函数,这样实现的功能就和在VC++里面把鼠标放在某个系统的函数上点击右键->go to the definition一样,这样我们就可以查看系统是如何定义的了。
在 Windows 7 下有个 Bug,如果安装路径有空格(例如:C:\Program Files\DEV-CPP\),那么编译dll会报错,解决方案:
修改安装路径为:C:\Dev-Cpp\,或者将设置中的缺省路径、包含路径等设置为长路径,例如:C:/PROGRA~1/DEV-CPP/。
配置文件路径[Windows 7]:C:\Users\%username%\AppData\Roaming\Dev-Cpp\devcpp.ini
语言文件路径:C:\Dev-Cpp\Lang\
本来官方原版是没有这个bug的,后来国内垃圾汉化,搞出了这个bug,真鸡巴恶心。
留言评论(旧系统):