本教程适用于:反恐精英起源(CSS)、求生之路、求生之路2等众多以Source(起源)游戏引擎开发的游戏。
SourceMOD插件制作基础教程, 此教程是我在某个网站找到的, 跟着加上自己的修改与修饰!
CS1.6的AMXX插件大家用的多了吧,但是CS1.6的效果总不能满足到玩家的视觉欲望,研究在国内CS Source又也是一个新的起步,所以转此帖,对于起源插件的初步国内初步扫盲~!!!
当然, 此教程也是针对于有Amxx基础的朋友!
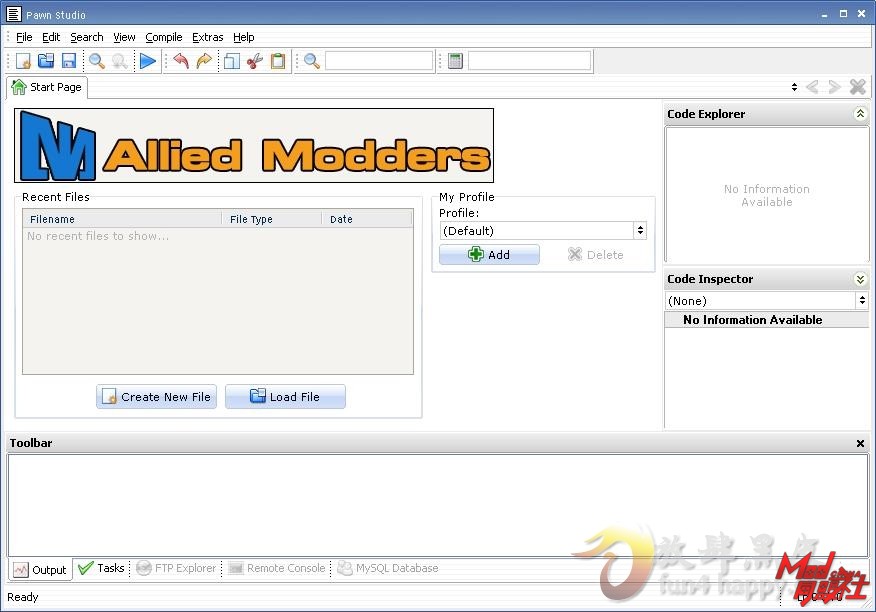
首先,制作起源插件,要用到Alliedmodders的PawnStudio(未汉化)与插件的头文件。
编译器和头文件在:http://www.sourcemod.net/downloads.php 都有下载,例如下载一个“sourcemod-1.3.8-windows.zip”,解压后,文件夹“sourcemod\scripting”中便是编译器和各种示例文件及头文件,compile.exe是命令行下的编译器,把源文件“*.sp”拖到compile.exe上去(源文件必须在compile.exe的目录中),便会在“\scripting\compiled”目录下生成编译好的*.smx文件。

此编辑器详细介绍: http://moddev.cn/thread-135-1-1.html
PawnStudio英文版: http://dl.dbank.com/c0i56156o4
要了解更多制作的方法,要多上国外的这几个论坛:
SourceMod Development-----SourceMod 开发文档:http://wiki.alliedmods.net/index.php/Category:SourceMod_Development
SourceMod API:http://docs.sourcemod.net/api/
SourceMod SDK: Class Members - Functions:http://docs.sourcemod.net/dox/functions_func.html
SourceMOD插件源码:*.sp
SourceMOD插件头文件:*.inc
SourceMOD插件编译后文件:*.smx
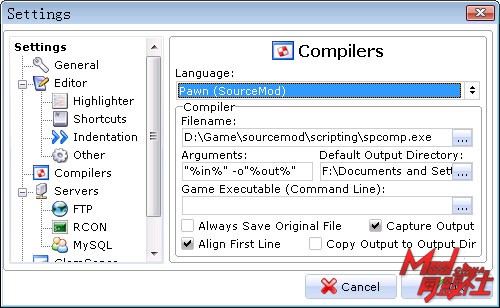
首先设置好编译器位置:

新建sp源码文件: 按下File->New->SorceMod->SourcePawn Script
然后会在编辑窗口出现以下代码:
|
以下是引用片段:
/* Plugin Template generated by Pawn Studio */
#include <sourcemod>
public Plugin:myinfo =
{
name = "New Plugin",
author = "Unknown",
description = "<- Description ->",
version = "1.0",
url = "<- URL ->"
}
public OnPluginStart()
{
// Add your own code here...
} |
这里我们以创建一个玩家登陆服务器,欢迎为例子.
public Plugin:myinfo= 这代子程序中的意思仅仅是做一个简介,让SourceMod知道这是个什么,具体的意思不做解释了,都是简单的英文
public OnPluginStart() 为插件被加载的子程序,也就是当你写的这个插件,被SourceMod加载的时候会被首先运行到的段落,只会被运行一次,通常这里都会写一些初始东西,例如我的lxd中这里写的是创建配置文件lxd-wind.cfg的东东.因为要写登陆欢迎的事件,所以这里就不会用到了,而此刻调用Sourcemod的API,于是我们打开 http://docs.sourcemod.net/api/
选择Clients,我们会发现许多
|
以下是引用片段:
OnClientConnect
OnClientConnected
OnClientPutInServer
OnClientDisconnect
OnClientDisconnect_Post
OnClientCommand
OnClientSettingsChanged
OnClientAuthorized
OnClientPreAdminCheck
OnClientPostAdminFilter
OnClientPostAdminCheck
................. |
而我们只需要OnClientConnected,意思为当客户端连接成功后
单击OnClientConnected,得知 Syntax:
forward OnClientConnected(client);
那么我们在代码中建立一个
|
以下是引用片段:
public OnClientConnected(client)
{
// 代码部分
} |
当玩家连接成功后会做什么
我们是写欢迎消息,因为这部分是Half Life通用的东东,所以我们到 halflife 里面去找.单击网页halflife
会看到
|
以下是引用片段:
PrintToChat
PrintToChatAll
PrintCenterText
PrintCenterTextAll
PrintHintText
PrintHintTextToAll |
我们可以选择各种不同的显示方式
PrintToChat 是现实在聊天窗口的信息,触发对象指定,这些你可以具体选择查看
因为我们是通告所有玩家,所以我们选择 PrintToChatAll,PrintCenterTextAll,PrintHintTextToAll中的任意一种
这里先说下颜色
|
以下是引用片段:
CPrintToChatAll ("\x01 1 .. \x02 2 .. \x03 3 .. \x04 4 .. \x05 5 .. \x06 6 .. \x07 7 .. \x08 8"); |
的结果为:

代码则为:
|
以下是引用片段:
PrintToChatAll("\欢迎x01 %N 来到 \x02 Left 4 Dead 玩家服务器,client) |
虽然我没有写过此类的插件,但是我们应该考虑一个问题,因为在Srdcs.exe中我们看见infected一方被创建后,依然占用了一个位置,不难想象他们是否也会触发相同的事件?不过按道理说,他们应该不是被Connect进来的,相反的如果我们用Putinserver(见Onclientconnected的那个网页)可能他们就会被触发.
为了安全起见,我们加上判断,依然看Client的那个网页
|
以下是引用片段:
Syntax:
native bool:IsFakeClient(client);
Usage:
client Player index.
Notes:
Returns if a certain player is a fake client.
Return:
True if player is a fake client, false otherwise.
Version Added:
1.0.0.1946 |
return的值为真,那么我们这里就需要判断假,也就是判断,如果该玩家不是fake client
|
以下是引用片段:
if(!IsFakeClient(client))
{
PrintToChatAll("\欢迎x01 %N 来到 \x02 Left 4 Dead 玩家服务器,client)
} |
因为SourceMod的语法和标准的C语言一样,所以很多东西都是通用的例如 &&=and || = or !=not
现在我们来看看,我们完成的所有代码
|
以下是引用片段:
/* Plugin Template generated by Pawn Studio */
#include <sourcemod>
public Plugin:myinfo =
{
name = "New Plugin",
author = "Unknown",
description = "<- Description ->",
version = "1.0",
url = "<- URL ->"
}
public OnPluginStart()
{
// Add your own code here...
}
public OnClientConnected(client)
{
if(!IsFakeClient(client))
{
PrintToChatAll("\欢迎x01 %N 来到 \x02 Left 4 Dead 玩家服务器,client)
}
} |
很简单吧,当然我们也可以通过其他方式来实现.
例如事件:http://wiki.alliedmods.net/Generic_Source_Events
核心事件,首先需要在Onplugins里面Hook事件。
|
以下是引用片段:
public OnPluginStart()
{
HookEvent("player_spawn", welcome);
} |
hookevent说明:
|
以下是引用片段:
native HookEvent(const String:name[], EventHook:callback, EventHookMode:mode=EventHookMode_Post); |
我们则创建
|
以下是引用片段:
public Action:welcome(Handle:event, const String:name[], bool:dontBroadcast)
{
} |
这样每当有玩家被创建的时候,就会执行这里的代码,不过此法很不好,不适合用来做欢迎信息.这里只是为了抛砖引玉.
好了就这么多了,其实很简单的,因为都是C语言的框架.当你了解了这个以后,对C语言可能也有更深一步的了解了.以后看到此类的东东也会很容易上手了
以下以换地图的脚本讲解下
|
以下是引用片段:
#pragma semicolon 1
#include <sourcemod>
#define PLUGIN_VERSION "1.0.0"
#define CVAR_FLAGS FCVAR_PLUGIN
new Handle:voteTimeout; // 申明一个句柄
new bool:inVoteTimeout[MAXPLAYERS+1]; //申明一个数据类型 关于bool 可以到这里了解下 [http://baike.baidu.com/view/1557195.htm]
public Plugin:myinfo =
{
name = "NewMap Change",
author = "AlliedModders LLC",
description = "BY WIND",
version = PLUGIN_VERSION,
url = "http://www.sourcemod.net/"
};
public OnPluginStart( )
{
RegConsoleCmd("sm_newmap",check, "changethemap"); // 注册控制台指令 sm_newmap ,因为在sourcemod中的core.cfg中 sm会被定义为!所以,基本上大家都是习惯性的挂上sm,这样游戏里面就可以输入!newmap了,当然也可以是!sm_newmap
voteTimeout = CreateConVar("newmap_vote_timeout", "120", "玩家发起新地图切换投票需要间隔",CVAR_FLAGS,true,0.0); // 这里是刚才申明的句柄,这里要赋予它一个值.
}
public OnMapStart() //插件加载
{
for(new i=0;i<sizeof(inVoteTimeout);i++) // 一段循环, 因为前面已经MAXPLAYERS+1过了,所以这里 按照理解应该是 new i=0;i<maxclient();i++) 分别返回false值,
inVoteTimeout=false;
}
public OnClientConnected(client) //当玩家连接成功后
{
inVoteTimeout[client]=false; //赋予玩家false
}
public isInVoteTimeout(client)
{
if (GetConVarBool(voteTimeout)) // 如果为真
{
return inVoteTimeout[client]; //返回inVoteTimeout
}
return false; //返回
}
public Action:TimeOutOver(Handle:timer, any:client) //时钟
{
inVoteTimeout[client] = false; //设置为初始值
}
public Action:check(client, args)
{
if(GetConVarInt(FindConVar("sv_hosting_lobby")) == 1) // 这里是检测是否为大厅服务器
{
ReplyToCommand(client, "\x01[SM] Server was started from lobby. can change map because mp_gamemode is locked\x03");
return Plugin_Handled;
}
if(GetClientTeam(client) != 2) //判断是否为幸存者团队 1=怪物 3=空闲玩家
{
PrintToChat(client, "\x04[SM] \x01 你没有权限使用该功能.");
return Plugin_Handled;
}
if (isInVoteTimeout(client)) //如果为真isInVoteTimeout(client)) =true
{
PrintToChat(client, "\x04[SM] \x01你必须要等待 %.1f 秒才可以再次发起切换地图投票.",GetConVarFloat(voteTimeout)); //则提示你需要等待多少秒后才可以继续投票.
return Plugin_Handled;
}
inVoteTimeout[client]=true; // 不满足以上的判断则说明该玩家没有发表过投票,则现在给予他true的值,当下次再循环到的时候则会提示判断true,不再进行下面的操作
new Float:timeout = GetConVarFloat(voteTimeout); //定义一个浮点型数据类timeout,他的值从voteTimeout中获得,参见 Onplugins
if (timeout > 0.0) //如果时间>0,这里仅作为一个开关使用,如果我们在上面的onplugins中设置为0,这里的判断就会失效,那么一个人投票一次后就无法再输入!newmap来进行投票了.因为他们的值被给予了true而不会还原
{
CreateTimer(timeout, TimeOutOver, client); //创建一个时钟,附带参数client
}
newmap(client, args); // 执行子程序
return Plugin_Handled;
}
public Action:newmap(client, args)
{
new Handle:menu = CreateMenu(ModeMenuHandler); //申请menu,创建菜单ModeMenuHandler
SetMenuTitle(menu, "地图切换"); // 标题
AddMenuItem(menu, "option1", "地图切换"); //创建菜单
AddMenuItem(menu, "option2", "帮助说明");
SetMenuExitButton(menu, true); // 能够看见关闭按钮
DisplayMenu(menu, client, MENU_TIME_FOREVER); //永久显示菜单,直到用户操作
}
public ModeMenuHandler(Handle:menu, MenuAction:action, client, itemNum) //因为上面的操作都是针对menu(CreateMenu(ModeMenuHandler); ) 所以就跳到这里了
{
if ( action == MenuAction_Select ) // 判断操作选择
{
switch (itemNum)
{
case 0: // changemap
{
MapMenuVote(client, 0); // 调用子程序
}
case 1: // help
{
PrintToChat(client,"\x01[SM] 如果发现无法按下5,6,7,8,9,0键,请在控制台输入 bind 5 slot5; bind 6 slot6; bind 7 slot7; bind 8 slot8; bind 9 slot9; bind 0 slot10\x03");
}
}
}
}
public Action:MapMenuVote(client, args)
{
new Handle:menu = CreateMenu(MapMenuVoteHandler); // 又创建了一个新的menu
SetMenuTitle(menu, "请投票选择地图");
AddMenuItem(menu, "option1", "保持当前地图");
AddMenuItem(menu, "option2", "停尸间惊魂");
AddMenuItem(menu, "option3", "死亡电站");
AddMenuItem(menu, "option4", "血腥之城");
AddMenuItem(menu, "option5", "监狱惊魂");
SetMenuExitButton(menu, false);
VoteMenuToAll(menu, 20); //调出投票,20秒后自动消失,这些都是API,所以很简单的就能完成了,而真正的C语言就不会那么容易了.
return Plugin_Handled;
}
public MapMenuHandler(Handle:menu, MenuAction:action, client, itemNum)
{
if ( action == MenuAction_Select )
{
switch (itemNum)
{
case 0:
{
PrintToChatAll("[SM:] 投票失败,当前地图不会变更."); //选择1为保持当前投票,所以自然要给别人一点提示
return; // 跳出
}
case 1:
{
ServerCommand("changelevel l4d_mortuary01"); //执行服务器指令
}
case 2:
{
ServerCommand("changelevel l4d_powerstation_utg_01");
}
case 3:
{
ServerCommand("changelevel l4d_deadcity01_riverside");
}
case 4:
{
ServerCommand("changelevel l4d_deathaboard01_prison");
}
}
}
}
public MapMenuVoteHandler(Handle:menu, MenuAction:action, param1, param2)
{
if (action == MenuAction_End) //如果20秒不进行操作则
{
CloseHandle(menu); //关闭菜单
}
else if (action == MenuAction_VoteEnd) //如果投票结束后
{
MapMenuHandler(menu, MenuAction_Select, 0, param1); //调用子程序
}
} |
(完)

![]()
